


Mastering Modern Authentication in Web Applications: OAuth 2.0 Demystified


Introduction:
In today's digital world, web applications have become integral to our daily lives. From social networking and email to online banking and shopping, as we entrust these applications, security has become a paramount concern. This write-up demystifies OAuth 2.0 and provides practical code examples to help you master it.
Authentication vs. Authorization
Authentication and authorization are two essential concepts in computer security and access control. They serve distinct but interconnected purposes. In order to understand OAuth 2.0, we must understand the terms authentication and authorization.
Authenticationis the process of verifying the identity of a user, system, or entity. It focuses on "Who are you?" It ensures that the entity is who it claims to be.
Authorizationdefines the actions or resources that a user has permission to access. It focuses on "What are you allowed to do?" It enforces access policies and permissions.
Now that you understand authentication and authorization, let's explore OAuth 2.0.
What is OAuth 2.0?
OAuth 2.0 stands for Open Authorization 2.0 Framework. It is a framework for secure authorization and delegated access to protected resources, such as user data, on the web. It allows users to grant third-party applications limited access without sharing their credentials.
To understand OAuth 2.0, we must define the fundamental concepts used within the protocol. To make these concepts easier to grasp, we will analyze OAuth 2.0 in the context of a common real-world scenario:
Logging in to Sempahore with GitHub and accessing the GitHub REST API.
In this scenario, semaphoreci will prompt the user to log in with GitHub. GitHub will then authenticate the user. Once GitHub has obtained the user's consent, it will issue an access token to semaphoreci. Semaphoreci then uses the access token to access the REST API.
In OAuth 2.0 terminology, GitHub in this scenario is theauthorization server (AS).
The authorization server (AS) handles authenticating the resource owner. It obtains their consent and issues access tokens to clients. It plays a central role in the OAuth 2.0 flow
The REST API is a resource server(RS).
The resource server hosts protected resources, which are HTTP endpoints, and needs an access token as a credential to authenticate a request. In the case of GitHub, these resources are repositories, issues, pull requests, and more.
The Semaphore Web application is the client
The client is the third-party app that requests access to the resource owner's protected resources. The client uses the issued access token to access protected resources
The user is the resource owner
The resource owner is the end-user who owns the protected resources or credentials and has the authority to grant or deny access to them. The resource owner interacts with the client application to provide consent for access. In the GitHub scenario, the user is the one who creates the repositories, issues, pull requests, and more.
These terms are the OAuth 2.0 roles, which are the entities in an OAuth 2.0 flow. The steps taken to get the access token are the OAuth flows.
OAuth 2.0 Flows
OAuth 2.0 flows, also known as grant types, specify how a client application can get an access token to access protected resources on behalf of a user. The choice of flow depends on factors like client type and the desired level of security. Let's provide a comprehensive explanation of OAuth flows in simple terms and discuss when to use them.
Types of OAuth 2.0 flows include the following:
- Authorization Code Flow:
Scenario: Imagine you're a GitHub user, and you want to use a code editing website. When you click "Sign in with GitHub" on the code editor's site, it redirects you to GitHub's login page. After logging in, GitHub provides an authorization code to the code editor, allowing it to access your GitHub account on your behalf.
Authorization code flow works as the standard for Single Sign-On (SSO). When you log in to one service (e.g., GitHub), it provides an authorization code to a relying party (e.g., a website). This code allows the website to access your identity and log you in without needing a separate login.
When to use:
Used for web applications and confidential clients.
It involves the exchange of an authorization code for an access token.
Provides a secure way to authenticate users and obtain access tokens.
This flow can be used in mobile apps using the Proof Key for Code Exchange (PKCE) technique.
- Implicit Flow:
Scenario: You're building a personal blog and you want to display a list of your public GitHub repositories on it. You add a widget to your blog that fetches this information from GitHub. There's no need for you or your blog visitors to log in or provide GitHub credentials.
When to use:
An access token is obtained without an authorization code exchange.
Use this flow when you want to access publicly available information from GitHub.
It's ideal for displaying your open-source projects on a website.
Designed for single-page applications (SPAs) and mobile apps
Generally used for less sensitive applications due to reduced security.
- Client Credential Flow:
Scenario: Think of a situation where a bank's ATM (application) needs to access the bank's cash vault (protected resource) to restock cash. The ATM has its access card (client credentials) to open the vault without involving a bank teller (user).
When to use:
- Used for machine-to-machine communication.
- Resource Owner Password Credentials Flow (ROPC):
Scenario: As a GitHub user who's using a command-line tool to manage your repositories, you can use your GitHub username and password directly with the tool to access your account.
When to use:
This flow is suitable for personal scripts or trusted applications.
Allows clients to collect and use the user's username and password.
Considered less secure and should be used sparingly.
- Refresh Token Flow:
Scenario: Imagine you're using a GitHub mobile app, and you've logged in. After some time, your session expires, but you don't want to enter your credentials again. The app quietly uses a "refresh token" to get a new access token without bothering you with the login process.
Refresh token flow enhances SSO by allowing users to stay signed in for extended periods without requiring frequent logins.
When to use:
Used to get a new access token using a refresh token.
It's ideal for maintaining user sessions across multiple services without inconvenience.
Let us explore what we have learned so far by creating our own OAuth app.
Implementing OAuth 2.0 in React
In this section, we will learn how to implement the OAuth 2.0 authorization code flow in React using Passport JS. This involves many steps, including setting up a GitHub OAuth app, creating React components, and handling the OAuth flow. I'll guide you through the process step by step and provide code snippets for each part.
Prerequisites
Node js(npm)
Basic Knowledge of React and JavaScript
Proxy Server (Express js)
We will build this app using GitHub as our authorization server and the Authorization Code Flow.
GitHub Client ID and Client Secret
Client ID and Client Secret are essential components of the OAuth 2.0 flow for interacting with the authorization server to get the authorization code. To obtain a GitHub client ID and client secret, follow these steps:
- Sign in to GitHub
Ensure you have a GitHub account or create one if you don't already have it. You'll need this account to create a GitHub application.
- Access Developer Settings
Once logged in, go to the GitHub developer settings to create your new OAuth App
- Create a New OAuth Application
On the developer settings page, you'll find a menu on the left. Click on "OAuth Apps" under the "Developer applications" section. To create a new OAuth application, click on the "Register a new application" button.
- Fill Out the Application Details
GitHub will present you with a form where you need to provide details about your application.
Application name: Give the app a name of your choice. In this example, it's "Auth2App.".
Homepage URL: Enter the URL of your application's homepage.
Application description: Describe the purpose of your application.
Authorization callback URL: This is the URL where users will be redirected after granting or denying access. It should match the URL where you handle OAuth callbacks in your application.

- Generate Client ID and a client secret.
Once you've filled out the form, click the "Register application" button. GitHub will generate a Client ID and Client Secret for your application. You'll see them displayed on the application's settings page.
- Safeguard Your client's Secret
That’s it. All done copy your client ID and client secret, and save somewhere safe.
Setting up the backend
Since we have secured our GitHub Client ID and Secret. Now let’s implement our backend using Node.js, Express framework, and a Node.js middleware authentication library called passport.js. Let’s follow the following steps to get started:
Create a directory to house our Project, in this example auth2app
mkdir auth2appCreate another directory inside it and name it server:
cd auth2app && mkdir server && cd serverInitialize our new project inside our server directory:
Npm init -yInstall the libraries and Packages we need:
Npm install express passport passport-github2 cors cookie-sessionCreate a new
.envfile to secure your Client ID and Secret that was obtained from GitHub:touch .envEnvironment variables dotenv help to improve security while coding. You can add it to your gitignore file to prevent it from uploading along with other source codes.
Then, add the Client ID and Secret. The content of the
.envshould look as follows:CLIENT_ID = "Input your Id here"; CLIENT_SECRET = "Input your Secret here";Next, create a file where the
passport.jsstrategies code will be stored:touch passport.jsAdd The following code to your
passport.jsfile, to update all our variables:require("dotenv").config(); const passport = require("passport"); const GithubStrategy = require("passport-github2").Strategy; //Input your client id and client secret. GITHUB_CLIENT_ID = process.env.CLIENT_ID; GITHUB_CLIENT_SECRET = process.env.CLIENT_SECRET;Import your desired
passport.jsstrategy from the Passport.js website. Here we are using the GitHub 2 strategy.passport.use( new GithubStrategy( { clientID: GITHUB_CLIENT_ID, clientSecret: GITHUB_CLIENT_SECRET, callbackURL: "/auth/github/callback", }, function (accessToken, refreshToken, profile, done) { done(null, profile); } ) );Now since we using sessions and cookies, we have to serialize and deserialize the user:
passport.serializeUser((user, done) => {done(null, user)});
passport.deserializeUser((user, done) => {done(null, user)});
Now Let's Create our express route file named
auth.js:touch auth.jsAdd The following code to your
auth.jsfile, to declare all variables:const router = require("express").Router(); const passport = require("passport"); const CLIENT_URL = "http://localhost:3000/";At this point, we will start adding endpoints for different tasks. Add the
/githubendpoint to authenticate the user using passport:router.get("/github", passport.authenticate("github", { scope: ["profile"] }) );Add another endpoint to set our Callback function. This will include Redirect if authentication is successful and Redirect if authentication is unsuccessful:
router.get(
"/github/callback",
passport.authenticate("github", {
successRedirect: CLIENT_URL,
failureRedirect: "/login/failed",
})
);
Since we don’t have an endpoint for
/login/failed. Add this code to create a/login/failedendpoint:router.get("/login/failed", (req, res) => { res.status(401).json({ success: false, message: "Failed to Authenticate", }); });Since we have created the
/login/failed. We will also have to create a/login/successendpoint. Here we used an if statement to check if the user is authenticated:router.get("/login/success", (req, res) => { if (req.user) { res.status(200).json({ success: true, message: "Successful", user: req.user, }); } });Then add the
/logoutendpoint, this helps a user to log out from a session:router.get("/logout", (req, res) => { req.logout(); res.redirect(CLIENT_URL); });Additionally, we need to export our router:
module.exports = router;Now Let's Create our main JS file named
index.js:touch index.jsAdd The following code to your
index.jsfile, to declare all our variables:const cookieSession = require("cookie-session"); const express = require("express"); const cors = require("cors"); //From Passport.js file require("./passport"); const passport = require("passport"); //From auth.js file const authRoute = require("./auth"); //Initialize a new Express app const app = express();And add the following middlewares to set cookies, initialize passport, resolve CORS(configuration) and our authRoutes endpoint(/auth).
app.use(
cookieSession({ name: "session", keys: ["OAuthapp"], maxAge: 24  60  60 * 100 })
);
app.use(passport.initialize());
app.use(passport.session());
app.use(
cors({
origin: "http://localhost:3000",
methods: "GET,POST,PUT,DELETE",
credentials: true,
})
);
app.use("/auth", authRoute);
Now you need to make the Express app Listen on your desired port number:
app.listen("5000", () => {
console.log("Server is running!");
});
Implementing the React Frontend
Go to the auth2app directory and bootstrap a new React project using Create React App:
npx create-react-app clientInstall the libraries and Packages we need:

npm install react-router-dom
Open theApp.css file in the src directory of your React project and add the following CSS code:
.navbar {
padding-top: 30px;
height: 50px;
display: flex;
align-items: center;
justify-content: space-around;
}
.list {
display: flex;
align-items: center;
list-style: none;
}
.listItem,
.login-text {
color: #000;
text-decoration: none;
margin-right: 20px;
font-weight: 500;
cursor: pointer;
}
.avatar {
width: 32px;
height: 32px;
border-radius: 50%;
object-fit: cover;
}
.login,
center {
cursor: pointer;
position: absolute;
top: 50%;
left: 50%;
transform: translate(-50%, -50%);
}
This will help to style the navbar component, the Dashboard, and the Home ‘Login with GitHub’ button.
Update yourApp.js file to import the necessary methods and hooks by adding the following code just above the App component:
import Navbar from "./components/Navbar";
import "./app.css";
import { BrowserRouter } from "react-router-dom";
import { useEffect, useState } from "react";
Add the following Navbar component just before the App component:
const Navbar = ({ user }) => {
const logout = () => {
window.open("http://localhost:5000/auth/logout", "_self");
};
return (
<div className="navbar">
<span className="logo">
<Link to="https://semaphoreci.com/" target="blank">
<img src="logo.png" height="25" width="150" alt="semaphore logo" />
</Link>
</span>
{user ? (
<ul className="list">
<li className="listItem">
<img src={user.photos[0].value} alt="" className="avatar" />
</li>
<li className="listItem">{user.displayName}</li>
<li className="listItem" onClick={logout}>
Logout
</li>
</ul>
) : (
<>Login</>
)}
</div>
);
};
Here we passed ‘user’ as a prop so we can use it in our code. We simply used the the conditional ternary operator with the syntax :
user ? <dashorboard>:<login>. This simply states if there is a user, display some of the user details and the logout button, If there is no user available it will simply display login.Finally, update the App component with the following code:
const App = () => {
const [user, setUser] = useState(null);
useEffect(() => {
const getUser = () => {
fetch("http://localhost:5000/auth/login/success", {
method: "GET",
credentials: "include",
headers: {
Accept: "application/json",
"Content-Type": "application/json",
"Access-Control-Allow-Credentials": true,
},
})
.then((response) => {
if (response.status === 200) return response.json();
throw new Error("authentication has been failed!");
})
.then((resObject) => {
setUser(resObject.user);
})
.catch((err) => {
console.log(err);
});
};
getUser();
}, []);
console.log(user);
return (
<BrowserRouter>
<div>
<Navbar user={user} />
{user ? (
<center>
<p>
<b>Name: </b>
{user.displayName}
</p>
<p>
<b>UserName: </b>
{user.username}
</p>
<p>
<b>User Email:</b> {user.emails[0].value}
</p>
<img src={user.photos[0].value} width="100px" height="100px"/>
</center>
) : (
<>
<div className="login">
<img width="500" src="login.png" onClick={() => {
window.open("http://localhost:5000/auth/github", "_self");}}</>
</div>
</>
)}
</div>
</BrowserRouter>
);
};
Here we used React useEffect Hook to request our
login/successendpoint that we created in our backend server.Now, it's time to test out the implementation. Go to your server directory and run the following command to start up the server
node index.js
Open another terminal in your client directory and run this command to start our React app:
npm run start
This command will open up http://localhost:3000 in your default browser. You should see something like this when the server has started running:

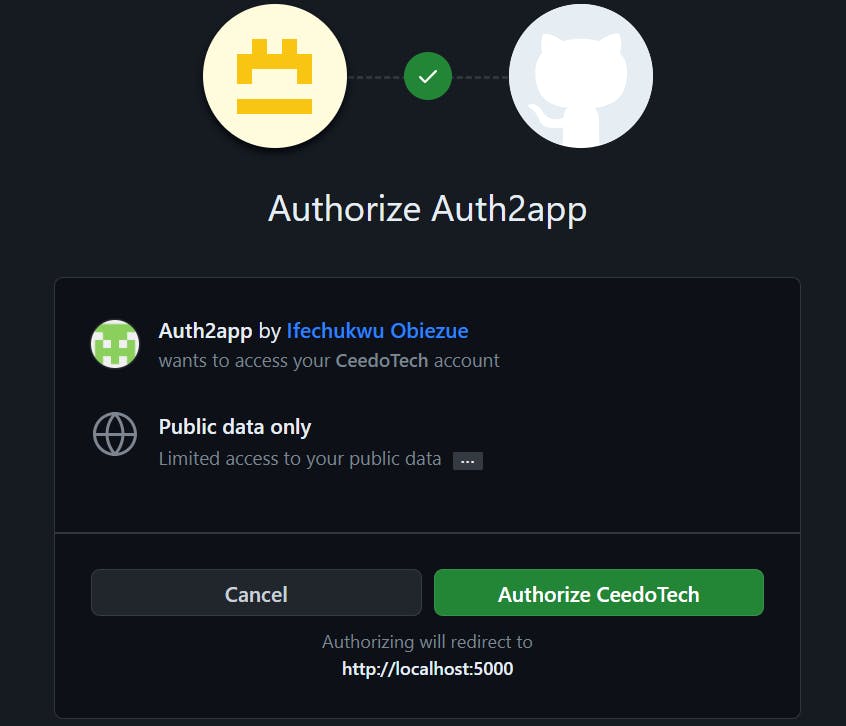
If you click on the Continue with GitHub button, you'll be redirected to the OAuth consent screen:
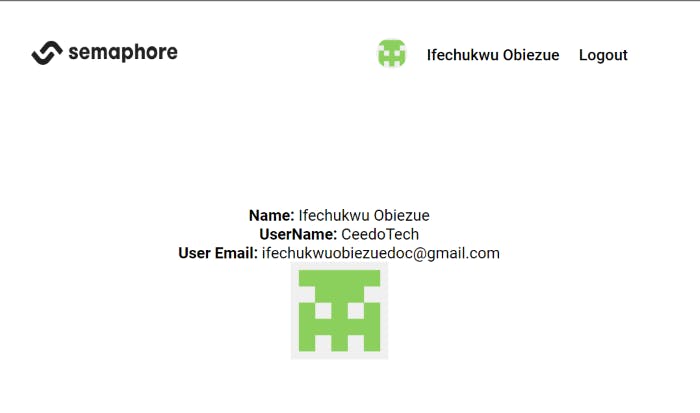
After you're redirected, you'll be logged in and authorized to access the post resources:
That’s it! Congratulations!🎉 You are done with the tutorial and have learned how to implement OAuth 2.0 authorization code flow in React using Passport JS. Great work!
Conclusion:
OAuth 2.0 is a powerful tool for building secure and user-friendly web applications. With a solid understanding and practical code examples at your disposal, you can confidently implement modern authentication and authorization in your projects. You can implement different strategies with passport.js, some of which include Google, Facebook, BitKeep, and many more, using the example laid out for you. Keep security and usability in mind, and your applications will thrive in today's digital landscape.